
Do you remember my “paint chip wall” back from our first photo shoot?

I absolutely love the piece! I was inspired to make it because I wanted a background that was one-of-a-kind, colorful, and spoke to the fact that we are designers. I also wanted something with awesome texture to really make the photos interesting.
So, first I went to a local home improvement store and gathered a ton of paint chips. I don’t recommend that everyone go and do this for obvious reasons, but I did not feel bad because I spend tens of thousands of dollars at these places every year. You could use post-its though for a very similar and affordable look.
After I gathered my paint chips, my trusty helper (Kelsey) glued them down to some masonite board.
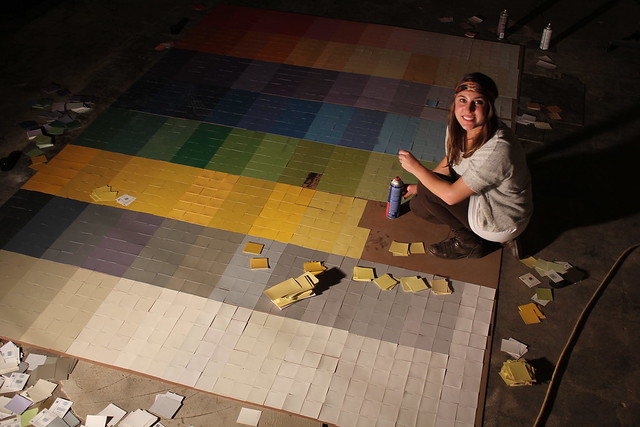
I was liking the look, but I still wanted to add some fun texture. So, I came back through and glued the chips in way that they would flip up from the wall/board. I loved the look this created!

Like I’ve said before, we were wanting this photo shoot to tell a story about who we are. This backdrop coupled with the “raining paint chips” definitely gives you a sense of our personalities and passions, right?! A fun, crazy creative couple who loves design, color, and each other! Did you get all that from this photo? I hope so! 🙂

I was really hoping to have multiple photos with this backdrop. But unfortunately, our photographer did not get the memo. I was pretty bummed about that, but I did learn a lot about communication through the process.
Here is one more photo we got that we probably won’t ever use. I don’t feel like it represents us nearly as well.
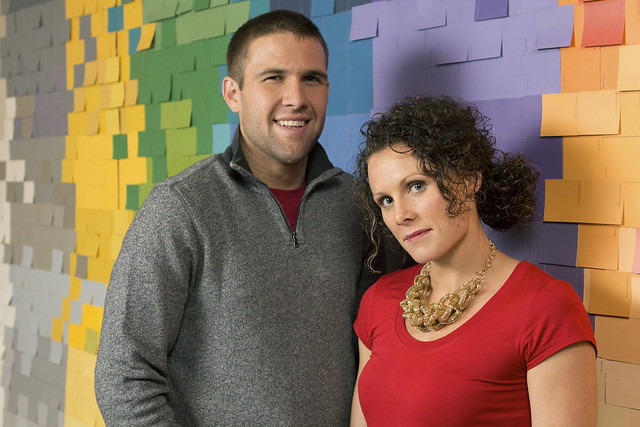
Even though we only got one good photo out of this backdrop, it is probably my favorite photo ever! Plus, I have plans to put this backdrop to work for a different purpose! 🙂
As always, if you’re inspired to create something after seeing this project/post, we would L-O-V-E, love to see what you do!
‘Til tomorrow!
I like learning the backstory. I totally assumed these were post-its. Hats off to Kelsey. That was a big job!
I love this! You look like you’re having so much fun in the photo… and I definitely agree about adding the texture… I feel like it adds so much dimension
This is a great look and would work well in a smaller size as just a piece of wall art … maybe framed. I’d love to try it. Did you reglue all the chips back on or just layered a few more over the ones already pasted down? I gotta get me an assistant. Wish my kids still lived at home….haha
this is a fun idea. I always see paint chip projects. I started collecting them every time I am at home depot or lowes. I will have to see how creative I can get with them!
I love that backdrop. I think my photographer friend should do something similar!
I love this wall! It looks so saaaweet! I love the dimension added by curling them up a bit!
So neat. So cute. So loving it. I can totally see your desired interpretation!
http://leeanderin.blogspot.com/
I love your necklace – where is it from?
I absolutely love this. Have been hemming and hawing about putting one of these up permanently. How well do you think it would hold up?
Post-its would totally work Dana! But I like the way the paint chips particularly speak to our story! 🙂
We were having tons of fun! That smile is a real, joyful smile. I don’t know why, but watching the paint chips float to the ground made me insanely excited!! 🙂 PS- Go to that meeting next week beautiful lady. . . we all mess up, it’s nothing to be embarrassed about, just don’t let it keep you down!
Becky- assistants are pretty great, I have to admit! 🙂 You should definitely try it on a smaller scale! I just layered a over the chips that were already glued down. I used rubber cement, brushed a stroke on the top portion of the paint chip, and as I stuck it down with one hand, I lifted the other side up to create the “flip.” Hope that helps! I’d love to see your smaller version when you get done!
There are tons of great paint chip projects out there! I’d love to see what you come up with! Send some pics my way!
Jill I think lots of photographers would have fun with a backdrop like this! I’m sure we would see so many creative poses and pics from it. Does your photographer friend generally do creative backdrops? Does he/she have a website?
Thanks Lindsey! Saw you got a “Let’s Run Away” print! Awesome! You most post pics of it once you get it hung!
Thanks Erin! Glad you can see “us” in it! PS- I love “American Idol” too! 😉
Well, thanks! I used to hate gold and now it’s my fav! The necklace is from Express. 🙂
Hey Stef! I am planning on putting this up permanently in my office area and I think it should hold up great. We used rubber cement for the ones that are “curled” up so they are really stuck on there. You should totally do it!
I love it, and that raining paint chips picture is super cute!! I’ve been thinking of making some sort of background to use at our wedding, (no date yet, just brainstorming!), for guests to take pictures in front of and was thinking big paper flowers, but this is right up our alley!
I did some similar art using paint chips last year to bring some color into our living room, (http://our1stnest.blogspot.com/2011/06/canvas-redo.html), but never thought of doing it on a larger scale. Thanks for helping me see something that I literally look at everyday as an option!!
Hi. Love this idea. I have had trouble sourcing large sheets of masonite. Where do you get yours?
Thanks, Glad you like it!
Here in Tulsa, you can find them at either home depot or lowe’s. Some people will call it hardboard or fiberboard. It is generally sold in 1/8″ or 1/4 thicknesses. Here is a link to it on the lowe’s site.
http://www.lowes.com/pd_15483-46498-SS1254825_0__?productId=3014304&Ntt=hardboard&pl=1¤tURL=%2Fpl__0__s%3FNtt%3Dhardboard&facetInfo=
I am soooo in love! I may need to recreate that! How long did it take? I’m posting an entire post highlighting some of your projects later in the week on my blog.
Sorry it took so long for us to answer your question. Thanks for featuring us on your blog, your readers have been too kind. This project definitely took a while. We had to get it done for our photoshoot so we called in some help, but I would guess it took about 50ish man hours. I know Kara will say that it was worth it. She loves this piece and picture!