
Hello Friends! So today I am pretty excited to show you one of my favorite DIY projects ever. It’s not my favorite because it was a completely unique idea. . .but because I figured out how to solve a huge problem and I think it turned out beautifully! 🙂

It all started when I was creating a design board for a client. She has a bar area and wanted to fix it up in time for a party she was planning. Rather than having a very “adult” type space, Heather wanted the area to feel “fun” and colorful! I can totally do fun and colorful! 🙂 So, I got to work and came up with some ideas I thought she would love.
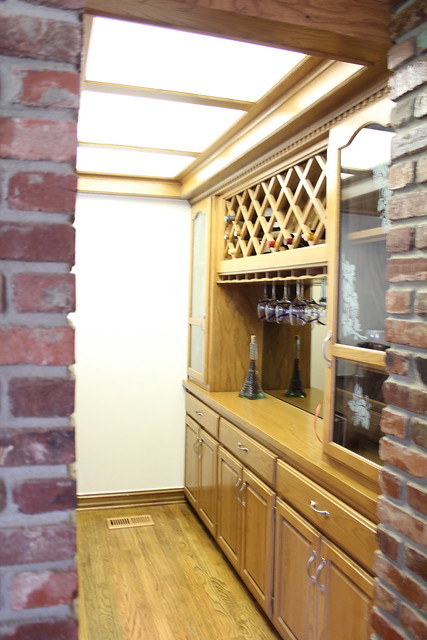
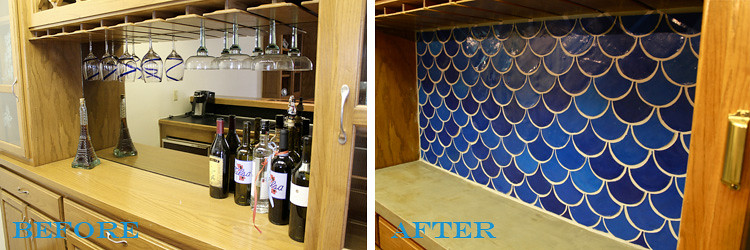
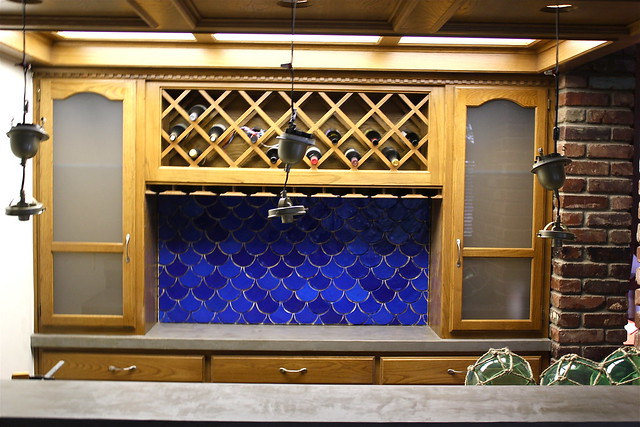
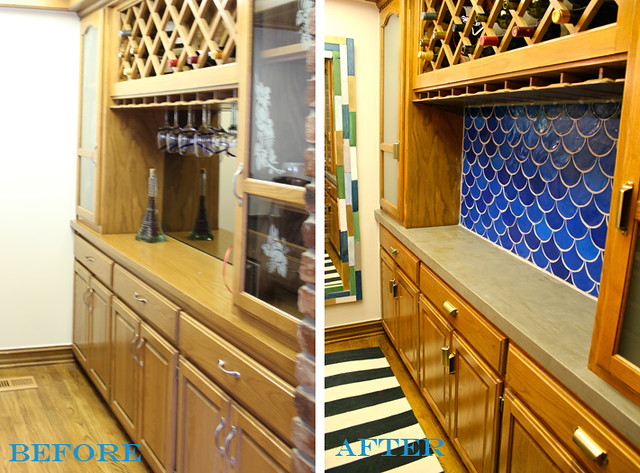
You can see in the photo below that there was a backsplash area that really called for a WOW factor. It is a major focal point and needed to deserve all the attention it was getting.
After thinking through a few ideas, I decided to present Heather with the idea of using fish scale tile. Luckily, she loved it! 🙂 I was thrilled and knew the look would be not only be visually appealing, but would also hint towards the family’s love of the Tulsa Golden Hurricane! Fish scales = ocean/beach Hurricanes=ocean/beach Are you seeing how I relate the two? 🙂 Oh, and the tiles wold also be TU blue!
Yes, it was a great plan. Then the problem occurred. I searched and searched for a place to purchase fish scale tile. I even contacted a company in Australia that sells the tile but never heard back from them. Of course eventually I would be able to get my hands on some of this unique shaped tile, but the date for the party was quickly approaching and I needed a solution fast.
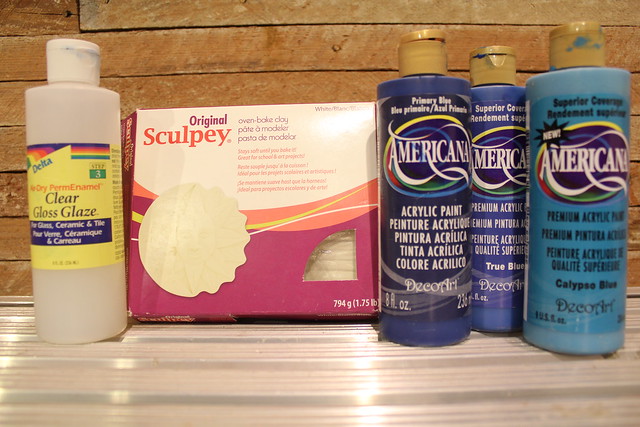
I thought about calling my friend Ashley Ann, but I remembered her kiln wasn’t set up yet and she has a lot of other things going on right now (like adopting a beautiful baby girl!). 🙂 Then I remembered seeing this clay that you could actually bake in the oven, so I went to check it out at my local craft store.
I read through the instructions and decided to give it a whirl knowing full well that I might have to scramble at the last second if this project didn’t turn out. So, I bought the “Sculpey” oven-bake clay plus some water based acrylic paints and a clear gloss glaze for ceramics and tiles.
So, here’s the process I went through to create my very own fish scale tiles
Step #1- Knead the clay to warm it up and make it more pliable.
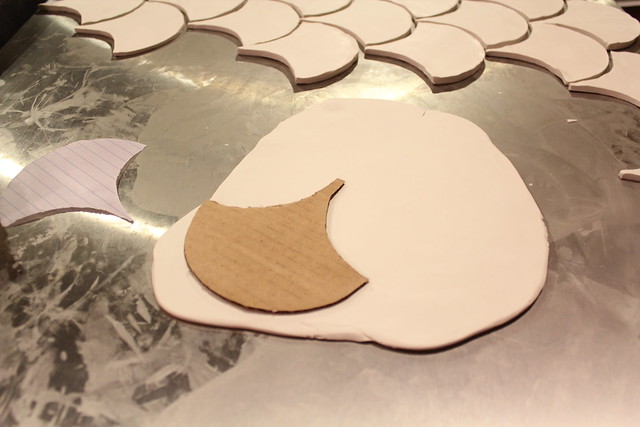
Step #2- Once it’s fairly easy to shape, use a rolling pin to make a flat, relatively even blob of clay. (Yes, blob is a technical term and yes, this is the first time I’ve ever used a rolling pin.

Step #3- Make a fish scale stencil. Be sure that the left and right side curves are identical. This is important so that the tiles lay correctly.
Step #4- Peel your clay off the surface it is on to break the bond created by rolling it out. Then lay it back down in it’s original position.
Step #5- Hold your stencil on the clay as you use a razor blade or knife to cut out around it. Do this as many times as your piece of clay will allow.
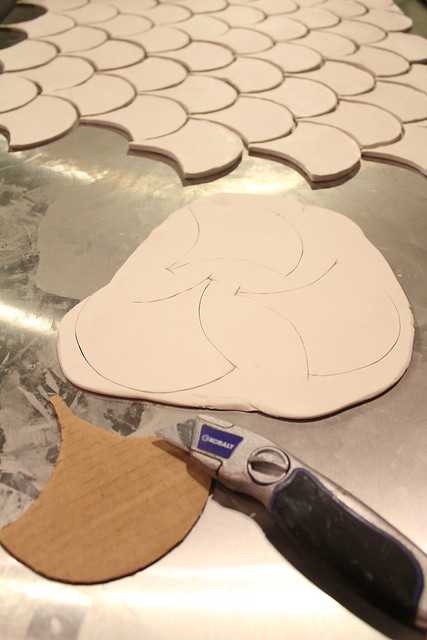
Step #6- Peel the access clay from around your scales and then set the scales to the side.

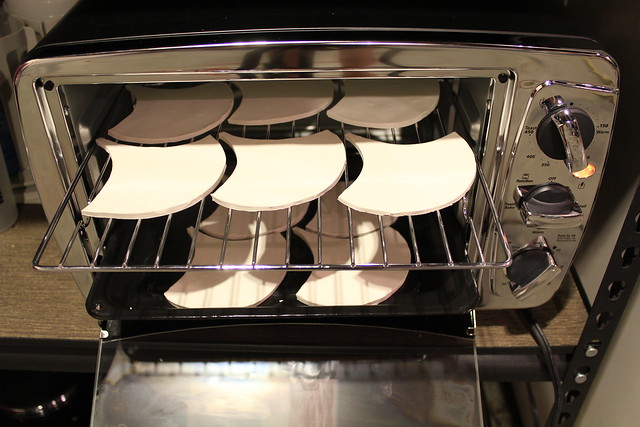
Step #7- Once you are finished cutting out the scales, place them in your oven for the amount of time recommended on the box. The thickness of my tile called for 15 minutes in the oven.
We don’t have a real working oven right now, so I went and bought this handy dandy toaster oven. 🙂
Step #8- Once your tiles have been baked, it’s time to paint them! I did about 3 coats on each tile using different shades of blue.
Step #9- After the paint has throughly dried, add a couple coats of the clear gloss glaze. Allow to dry completely.
Step #10- Then it’s time to apply your tiles to your surface. I used liquid nails as my adhesive.
Step #11- As you begin to apply tiles to your surface you will inevitably have to make some cuts to fill your space. These tiles cut very nicely with a sharp razor blade.
Step #12- After allowing the adhesive to dry completely, it is time to grout the tiles.

Step #13- Lastly, you will need to seal the grout. You can find grout and grout sealer at your local hardware store.
Finally your left with something that looks like this!
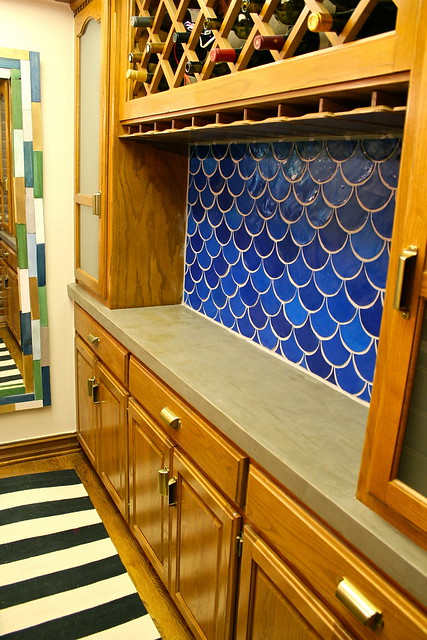
You may be wondering how these tiles will hold up in comparison to normal tile. They are different. They are less breakable but do to their “softer” nature, I am not sure they would hold up as flooring. If sealed really well, they may be able to go in a shower, but that is something that I need to test. For this application however, it was perfect and I think both Heather and I are pleased with the outcome! What do you think!?
looks awesome!
Oooooo! I have an idea using a stencil pattern, cutting the clay, and using it as a backsplash! Thanks for the inspiration!
LOVE, LOVE, LOVE THIS!!!
These are gorgeous.I am going to have to find a spot to put something like this. Is the Sculty very expensive? Anyway….amazing.
This is awesome!!! Such a great idea! How does this compare in cost to other tiles?
I think that turned out just awesome! Way to think outside the box!
I just found your blog and I love it! You have such creative ideas.
You are a crazy pants!!! That tile turned out so good! I can’t imagine all the patience it would take to MAKE YOUR OWN TILE!
Nikki Kelly
This is great! I’m not sure I could execute it as well as you because I’m not very patient, but your version looks awesome.
Wow – this is a brilliant idea. I used to work with sculpey all the time growing up, just never thought about using it as an adult for anything. WHAT A GREAT IDEA, KARA!
P.S. – for a maker of similar tile you can get in the U.S., check:
http://www.akdo.com/products_list_coll.asp?collid=55 (you know, if you don’t have time on your hands next time!!!)
Still – amazing!
I had no idea you could hand-make ceramic tiles in an oven – thanks for enlightening me! Beautiful work, Kara.
It’s amazing! Fit’s the spot perfectly!
Ummm…quite a bit cooler than the little pigs I made with Sculpey as a tween. I didn’t make anything else. Just pigs, pigs, pigs. Your fish scale tiles turned out so well!
Lisa
A Farewell To Can’t
I am so impressed. I think I would have been freaking out too much to come up with something so amazing! Awesome job.
Can I ask what kind of treatment you used on the counters?
We love it and are very happy with it! Kara does great work and with such care and patience!
very cool and fun!!
Thats what I call a custom job! Looks great!!
Looks fantastic!
Wow Kara, you are one determined girl! Those tiles are great!
This really delivers a “wow” factor and updates the bar. Beautiful!
Just came across your blog. This is a fantastic “springboard” idea! I’m thinking about doing this with the period stencils I have and outdoor paint to create outdoor mosaic artwork for my 1922 home! I’m thinking the polymer should hold up to covered outdoor use if I use the proper coatings. Oh, the possibilities! Thanks for such great ideas! 🙂
This tile work is gorgeous and super creative. I’m looking to do something similar in a bathroom. Have you tried this in a shower yet?
I can come up with some pretty nifty fixes, but Honey you have us all beat! Way to go! Mind if I follow along on your Journey of creativity? Would love to meet you someday. You have my tribute!
Is there any update on how these tiles handle as a shower tile surround? Would love to try this out for both kitchen backsplash and bath surround.
Totally amazing and very beautiful, to make sure one gets exactly the same thickness of the clay use one of the new rolling pins that allows you to put the appropriate size disc on each end this gives a continuity of thickness. Save time and sanity.
Has anyone tried to seal and use outdoors?
This is borderline genius for a splash! I’m with you I’m not sure I would use this on a shower surface but definitely for a mostly aesthetic piece.
I love this idea!!! My question is how much clay did you use for this project? I have a bigger project and I’m trying to price things out
I’ve been looking for a way to get the backsplash I want for less money, this is a wonderful idea! Is this still in good shape after all of these years?