I am sorry that I didn’t not check in last week with incredible answers for all your wonderful questions. Last time we spoke I told you that I would would answer a question submitted by the lovely Lesley if she would send me some pictures and arrange a noodling trip for me. Although I have not been noodling, I have been led to believe that this will happen sometime in the future. Being the innocent, trusting soul that I am, I will go ahead and offer my great advice.
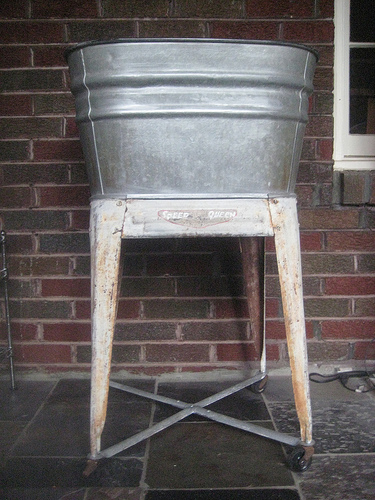
“Oh yay. So, I bought an old metal wash tub at a flea market. I’d been eyeing it for months and finally bought it. It’s attached to metal legs and wheels. I bought it wanting to turn it into a kitchen island/cutting board.
I guess my first question is do you know any good places to find a thick piece of butcher block (cheap would be best)? It measures about 19.5″ with rounded corners. I think a thick, dark butcher block would look kind of cool attached to the metal. Would butcher block be the best way to go? Any ideas of something else that would be cheap would also be awesome! I also think it would be awesome if I could attach the wood with hinges so I could hide things inside the basin. What would you recommend for the hinges since it will be going on metal and wood?”
Later on she sent me these pictures of her purchase.
I agree with Lesley, that wood is her best bet. I think a concrete or metal top would blend in too much, but the right piece of warm wood will make this thing come to life. It is easy to say, but a little tougher to execute. I would start out checking local flea markets for something that already has a lot of character. If you are taking on a similar project, follow Lesley’s lead and take measurements of your piece so you know exactly what you need. You could cut something down that was a bit to big, but don’t make the mistake of guessing and buying something to small.
If you don’t have time to wait to find the perfect vintage piece of butcher block I would check all the discount home good stores: TJ Maxx, Marshall’s, Ross and any others you know of. If no luck there I would then start checking online with all the usual suspects: Bed, Bath, and Beyond, Target, Walmart, Lowe’s, and Home Depot. If you find something that might work, run and check it out in person. I prefer to see things in person before I buy, but sometimes the deals are to good to pass up at online retailers like: ebay, overstock.com, buy.com, and amazon. This one I found on ebay could be shipped to your door for under $30.
I don’t have a lot of faith that it will last forever, but it may buy you sometime to get what you really want down the line.
I think everyone knows by know that Ikea sells butcher block countertops that can be cut to length. The Langan is about 25″ x 49″ and only $39. Lesley could actually get two tops out of this one piece and change them out when she likes.
Lumber Liquidators also sells butcher block countertops that are made of a few different species (cherry and maple) than what Ikea offers, but they charge a bit more, but still not a bad price for countertops.
If it isn’t worth the hassle of having to spend the obligatory 4 hours in ikea and the extra time cutting the piece to size then sanding and finishing the edges you might go ahead a spend a little extra for this guy.
This beautiful end grain cutting board from Lowe’s is the perfect size and wouldn’t need any tweaking, but you would pay for it to the tune of $119.
A lot of times I don’t think it is worth spending the extra money, but in this case I think I might could justify it. I am quite sure the ebay product will split and be in two pieces in less than a year, the ikea option requires a significant amount of extra work and unless you spend the extra time to finish the cut edges properly most people will be able to tell what you have done. Also the finger joints on their countertops kind of drive me crazy. The thickness of the end grain board would allow you to sand it down to refresh it when it began to look worn down, or that might be exactly the look you are going for.
I didn’t mean to spend so much time covering cutting boards, but I didn’t want to provide a half… hearted answer. There are countless ways to attach whichever cutting board you settle on to this basin. I will start with the simplest.
You could use self tapping screws or pre-drill through the metal lip and screw the cutting board in place. I would drill my hole a little larger than shaft of my screw, but smaller than the head. It will make things easier on you to pre-drill the butcher block as well, but the bit you use for that should be slightly smaller than your screw. This obviously prevents you from using the basin for storage, but is the most secure and straight forward option.
You can definitely use hinges to attach the cutting board, but it is not as straight forward as you might first suspect. If your cutting board has any overhang the thickness of the basin edge will prevent you from being able to attach a hinge to the inside wall of basin and the underside of the wood.
There are two work arounds. You could eliminate the overhang on the hinge side. Depending on the dimensions of the cutting board this may work out perfectly.
Another option is to raise the hinge a little bit. If you do this you will need to add something to the opposite side of the basin to allow the cutting board to rest in a level position when closed.
Lesley asked about attaching hinges to wood and metal. This is easy part. Any adequately sized, run of the mill hinge should work for these layouts. Attaching the hinge to the wood should be straight forward. My only advice would be to predrill. I figure Lesley was more concerned with the metal side of the hinge. After I had my layout I would mark where I needed holes then drill into metal using a bit that looked like this:
Not anything that looked like this.
Masonry Bit
Wood Bit
If you are going to buy a new bit you could obviously look for one marked “for metal”, but I am hoping some of you will find the courage to rummage through someone’s tools and find a bit yourself.
Sometimes it is hard to get started drilling in metal. The bit will want to “walk” away from your starting spot. To prevent this I will place a nail or screw on the spot I want to drill then hit it with a hammer to create a little divot to help keep my bit in place.
Once you get started drilling you want to keep your speed lower than if you were drilling through wood. You want to keep your heat to minimum. On a basin like this with somewhat thin walls, it is not as important as say drilling through 1/4″ steel. If you will be drilling for a while I recommend periodically place a few drops of cutting oil where you will be drilling.
Once you have your holes you have a few options to attach the hinges. You could use rivets, but they are permanent and cannot be tightened if they loosen with time. I would use machine screws or carriage bolt and nuts. I would prefer the look of the head of the screw or bolt, so I would place it on the outside of the basin and use the nuts on the inside.
Again I have probably provided a lot more information than was necessary, but I am hoping to provide helpful information to all the readers while answering Lesley’s specific question. Hopefully she hasn’t already figured something out while waiting on me and will send us some pictures of whatever she decides to do.
‘Til tomorrow.



I have an idea for Lesley, it might be a little more work if she has the tools or out of the way if she has to have it done. If she used a thicker piece of butcher block then she or someone could route a channel out of the under side that would fit over the edge of the basin. That way she doesn’t have to alter the basin, the butcher block is evenly placed on the basin, and she can still have access inside the basin. She could even take the butcher block off and fill it with ice Nd drinks for parties too!
I agree with Nikki, I was about to comment about the routing option myself. I think it would also be the easiest.
Wow, Tim! What an answer!! Thank you so much for the great ideas on the butcher block. I love the look of the Lowe’s one but will probably be searching flea markets and garage sales first. Thanks for taking the time to help me out with the hinges too, the sketches made it pretty easy to understand. I’m so excited to get this thing finished up and in my kitchen!! Thank you so much!
Oh, and I like the routing ideas too. Thanks, ladies. I hadn’t thought about that.
How about instead of routing out a ridge, Lesley could just attach a few nails/dowels/small blocks of wood around the underside of the butcher block in the shape of hte basin so that they fit snug against the edge of the basin when the ‘lid’ was closed. So that way the block wouldn’t move around on the basin but could easily be lifted up. Does that make sense?
Excuse me, is this ask nikki or jenniferlynn? Didn’t think so. Just kidding, I really like the routing option. I generally try to keep my answers pretty simple, So it is possible for most people. That being said, if you have a router it certainly is a great, probably better option. If you don’t have a router, anonymous’ answer achieves the same thing. While it might not look quite as “professional,” you would probably be the only one who knew. Great ideas!
I love this feature 🙂