Hey Friends! Even though I’m at Anthro in the mornings now, please don’t feel like you can’t connect with me! I get a break here and there and the first thing I do is hop on my I-phone to see if anyone has commented on the blog. You guys mean the world to me and I look forward to our “conversations” via the blog each day. Thank you so much for reading and taking the time to care about what’s going on in my life. Hopefully I provide you with plenty of inspiration to keep you coming back!
Today I am going to share how I created the remaining busts and silhouettes I didn’t cover in the last post. If you missed the first edition, click here.

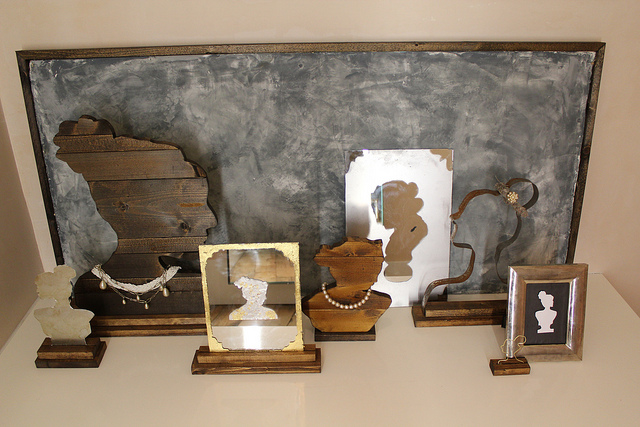
Today we’ll start with the two mirrored silhouettes.

You may already have mirrors that you can use. But if not, I got mine cut to the exact sizes I wanted at Lowes. And because they used scrap pieces, they only cost me $2.
I don’t have a lot of step by step photos of these two, but I believe they are pretty self- explanatory.
For the silver mirrored one:
Step 1- Cut out a profile you like from a piece of paper and tape it onto the mirror.
Step 2- If you like the look, cut out some corner shapes and tape them onto the mirror.
Step 3- Spray paint the mirror.
Step 4- Remove the taped-on pieces of paper.
Step 5- Use a Q-tip and paint thinner to clean up any lines that need it.
For the gold leafed mirror:
Step 1- Cut a silhouette out of some paper and gold leaf it. I like a product called “Simple Leaf.” Here is a silver/gold leafing how-to video if you need it.
Step 2- Use spray adhesive to attach the gold leafed silhouette to the mirror.
Step 3- Create a border by applying the gold leaf adhesive to the mirror with a small brush. Wait for the adhesive to get tacky and then apply the gold leaf.
Step 4- Use paint thinner to clean up lines or to distort the lines to make it look a little older.
I just leaned the silver mirror against the backdrop but I wanted to create a base for the gold leafed mirror so it could stand on it’s own.


I simply ran a circular saw 3/4 of the way through a 1X2. I then attached the 1X2 to a piece of 1X3 and set the mirror in the slot created by the circular saw.
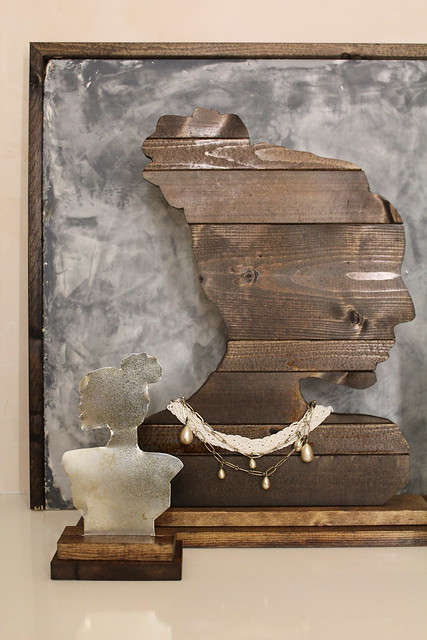
Now, to the metal bust.

This piece of metal was a scrap from a previous project. You can probably find something similar from a hardware store, but I got mine from a sheet metal place. You want the metal to be thick enough to hold it’s shape, but thin enough to bend. Mine was too thick to create a lot of detail so it looks a little cartoon-y. But I think that’s fun.
Step 1- Bend the metal into a bust-like shape. You will need some excess on both sides.
Step 2- Cut 2 pieces of wood for your base and stain them. I used 1×2 and 1×3.
Step 3- Wrap the ends of your metal around your top base plate and sandwich the metal between the two pieces of wood.

Step 4- Drill through the bottom base plate (the 1X3 in this case) and up into the top base plate (the 1×2). This will suck the two pieces of wood together and hold the metal in place.

And you’re finished!

Then there’s these last few.
For this tiny little guy I: bent some thin wire into shape, cut a slot in a piece of wood, and used hot glue to help it stay in place.

This metal one (to the left in the photo below) was cut out of roof flashing with heavy duty scissors. Once again, I cut a slot in the wood to make it stand up.
And there you have it, a collection of busts made from recycled materials that cost me $6 in total! I can’t wait to see if this inspires any of you to create your own busts or silhouettes. Please send me some photos if you do!
Holy cow these are amazing!! In fact I MUST share them on Twitter :0) I love checking in on your blog everyday….you seriously have the best ideas!
I LOOOOVE this! You are so stinking creative girl. Just to clarify, in the first one you described you used silver spray paint? It looks like you used glass etching so I wanted to double check. So very excited to see what you do at Anthro.
These are really amazing! Seriously you have some stellar ideas roaming around in that brilliant mid of yours!!
Thanks Ladies! I’m so glad you like them!! And yes, Shannon it is just silver spray paint, but kinda cool that it looks like etching! 🙂
That wood one at the bottom is so cool looking! Thanks for sharing your great ideas! 🙂
That wood one at the bottom is so cool looking! Thanks for sharing your great ideas! 🙂
These are fantastic, and I think would make for some really neat jewelry displays for shows that I do! Thanks for a great blog! Found you through Pinterest.
These are fantastic! I’ve been following you for a while, and don’t know why I haven’t come across these at all? Love them. A must diy, for sure 🙂
These are fantastic! I’ve been following you for a while, and don’t know why I haven’t come across these at all? Love them. A must diy, for sure 🙂
Hey Sara,
There are lots of projects out there and they have been a little confusing to find. We recently updated our DIY projects page with pictures. Hopefully that should make things easier!
http://karapaslaydesigns.blogspot.com/p/diy_27.html
I love all your ideas!!! You both are so creative. I saw yall on the Nate show.I was wondering how to make the mason jar light and what is the background for the sillouets.
thanks!!
Lori Proctor
Hey Lori,
I am glad you found us! If you go to the DIY projects tab underneath our header you will find a list (with newly added pictures) of most our projects.
I created this background by missing paint with drywall mud and spreading it kind of like a venetian plaster. Let us know if you end up making anything inspired from the blog! We love to see pictures!
Kara