Terrariums were big back in the 70’s (you may remember them in your mother’s or grandmother’s house), but that is not when they first appeared on the scene. No, terrariums have been around since the 1800’s. You can read a little about their history right here.


Well, in case you haven’t noticed terrariums have regained some popularity and are really picking up steam. The past year, I have started using plants to bring life into my spaces. And while I love the look of luscious greenery in my home, my black thumb doesn’t allow me to proudly display any plant I want. Luckily, I’ve found a few plants that are virtually no maintenance! They’re called succulents!
Succulents are: water-retaining plants adapted to arid climates or soil conditions. Succulent plants store water in their leaves,stems, and also in roots.
Of course when I decided I wanted to make my own DIY terrariums- I chose to use succulents. Ok, so let’s get to the tutorial!
First, gather your supplies:


You’ll need:
– terrarium gravel. (I found this at a local nursery, but as an alternative you can use pea gravel.)
– soil.
– decorative sand or pea gravel for the top layer.
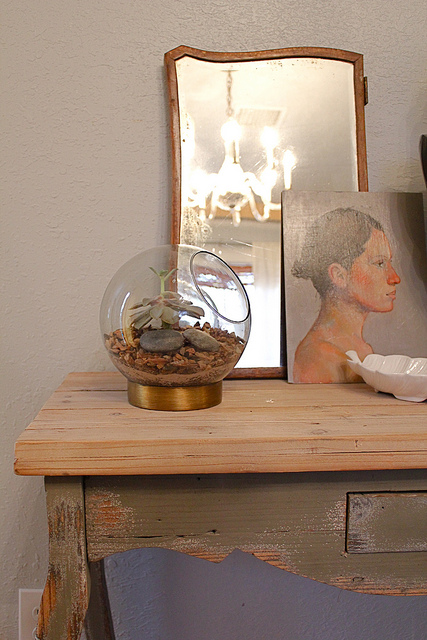
– a glass container of some sort. You can use anything from mason jars to fishbowls (I used an old globe from a light fixture.)
– plants. (as I said succulents are super easy and moss is another popular option.)
– a base. For my DIY terrarium, I wanted to use a glass bowl and therefore needed a base to balance the bowl. I decided to use some pieces of an old light fixture that I found at the Habitat ReStore. Photo below.

To make the fixture pieces into the base I needed, I simply loosened the nut underneath to release the cylinder shape on top of the circular base. Photo below.

I then flipped the circular base so that the glass bowl could securely sit down into it.

Then it was time to start adding ingredients.
Step 1- Add about an inch of terrarium gravel or pea gravel to the bottom of the bowl. This is to help with drainage.

Step 2- Plant your plants into your glass vessel using enough soil to cover the roots.

Step 3- Add decorative sand, pea gravel, and/or river rocks to finish off the top layer. Some people also like to add tiny figurines to add a touch of whimsy.

Lastly, you simply have to find a place to display your new living accessory. Below are some photos of one that I display in my master bedroom.

I water my terrariums and succulents once every two weeks or so. And so far so good! 🙂 Below is another one that sits on my kitchen window sill.

Terrariums are a great way to bring green into your life during the long cold and dreary winter months! I am thinking about making a bunch as Christmas presents for friends and family! Since the DIY versions cost less than $10 to make I can add people to my Christmas list rather than making cuts because the money ran out! YAY! Read this post to get some more terrarium ideas and DIY inspiration!
this is a cute idea, thanks for sharing xxx
Oh Yes, Thank you so much for sharing! I have been wanting to make something like this for a while, but have found the special vessels to be a bit too expensive for me. I too have a black thumb, so as little money invested the better. Thanks for this great idea I will have to keep my eyes open for just the right base, but now I have a plan!
Love it, love it, Kara!