
Today I am finally revealing every last inch of the bright and colorful office/playroom combo that I completed a few weeks ago! Before I got my hands on the space, the room was a bit dull and lifeless. There was no form and only a small amount of function. The homeowner wanted me to come in and not only create an incredibly functional space that could serve multiple purposes, she wanted me to make it visually pleasing to both children and adults. I was definitely up for the task.
Here’s what the space looked like BEFORE. . .
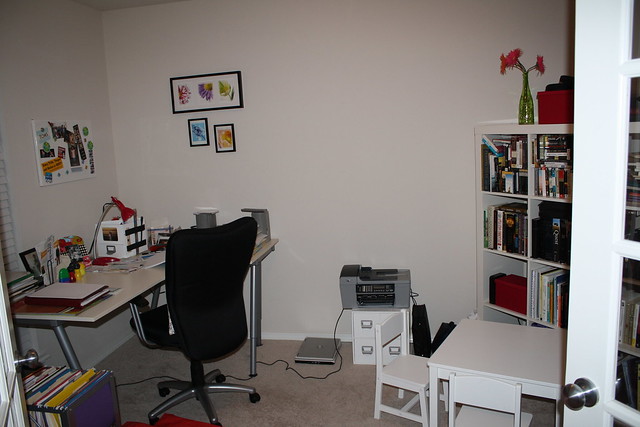
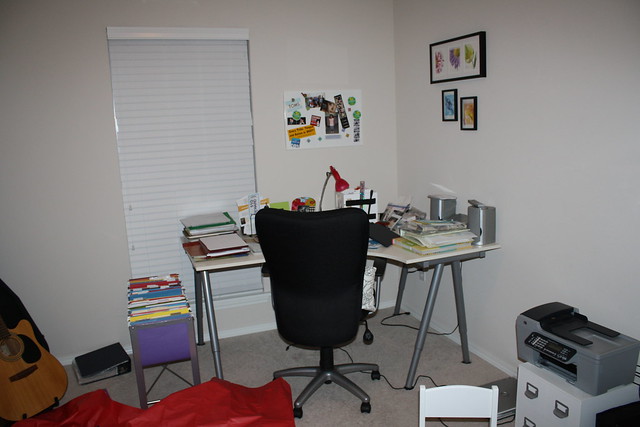
The space felt cramped and cluttered. Plus, almost everything was white, beige, or black and it just wasn’t working.
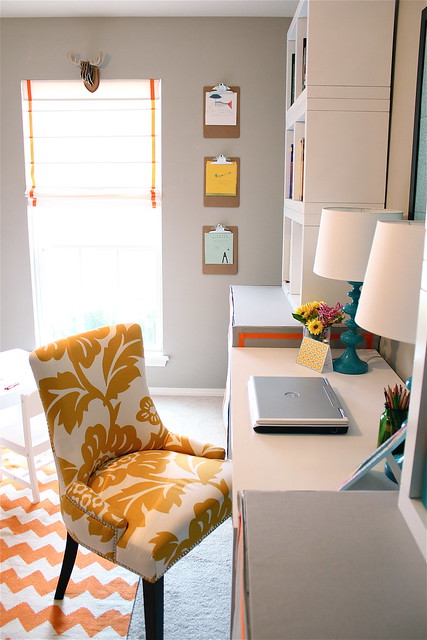
So let’s look at the AFTER. . .
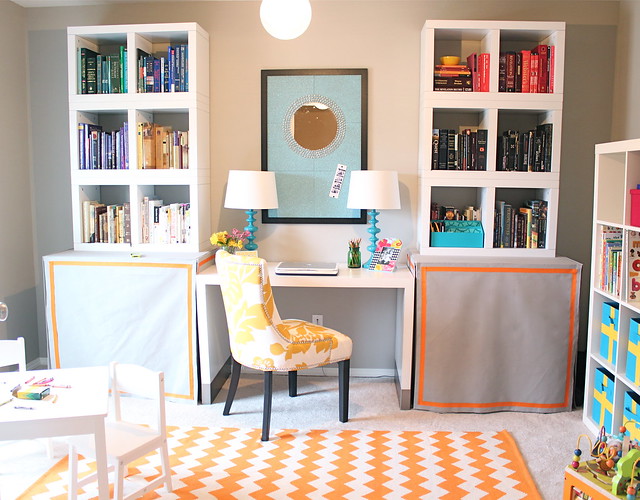
It’s crazy to me how much bigger the space seems now. Everything has a place and is stored in a way that is pleasing to the eye.
You may have thought to fit both a working office space and a child’s play area into this room that I would have to get rid of some furniture. I did exactly the opposite. I brought in a number of new pieces.
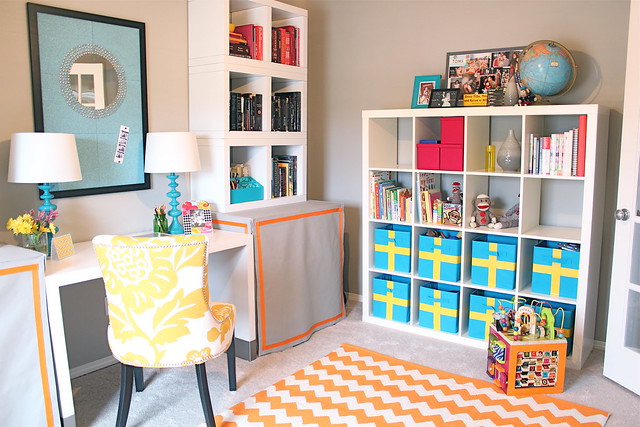
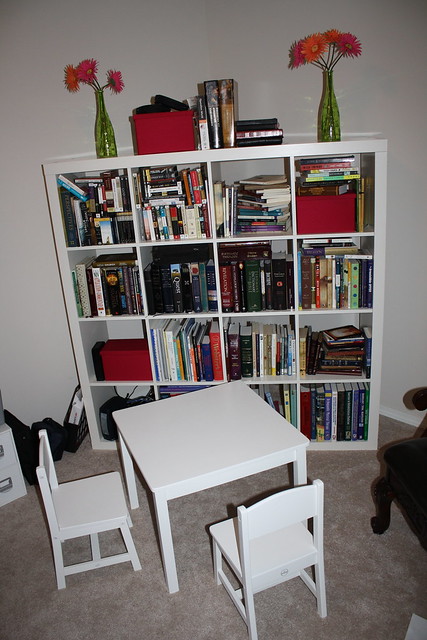
Of course, one of the things we kept was the Expedit bookshelf from Ikea. It was providing a ton of needed storage, but the way it was catty-cornered on the wall took up way too much space and the massive amount of books were shoved in place with no rhyme or reason.
BEFORE
AFTER
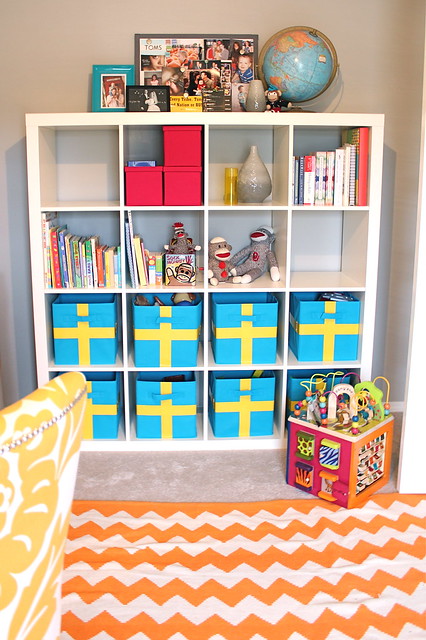
Can you believe that after I had reorganized the space and brought in a ton of the little one’s toys, I actually had room to spare! Two of the blue boxes are empty and two cubby holes sit waiting to be filled! Ahhh, success!! 🙂
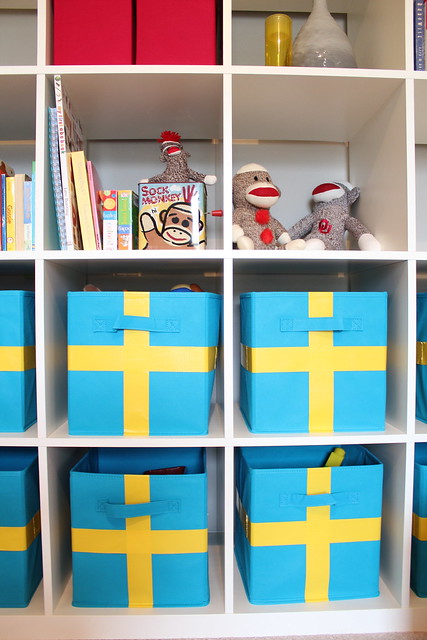
I could have left the blue boxes plain, but that’s just not my style. 🙂 I decided to go ahead and create a fun graphic on them with colored duct tape. It was something easy to add a little bit of interest.
So you may be wondering how I was able to not only keep everything (besides replacing the desk) that was formerly in the space and still bring a ton of toys into the mix. Well, it was all thanks to the two storage towers flanking the desk.
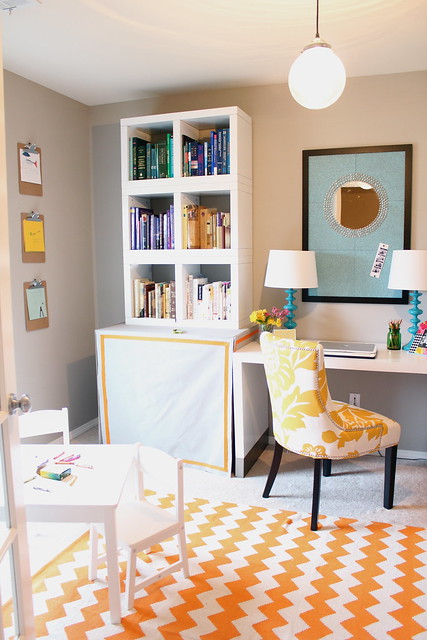
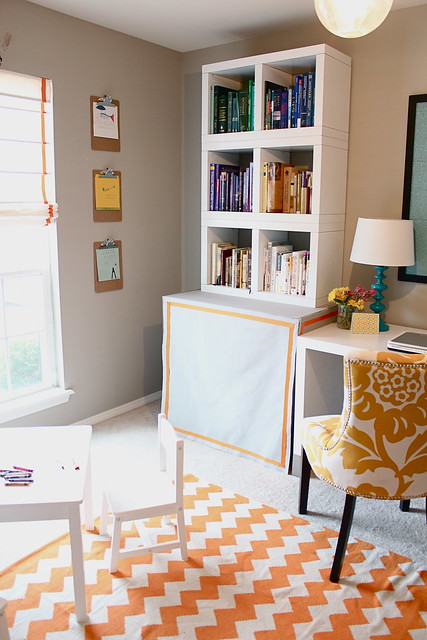
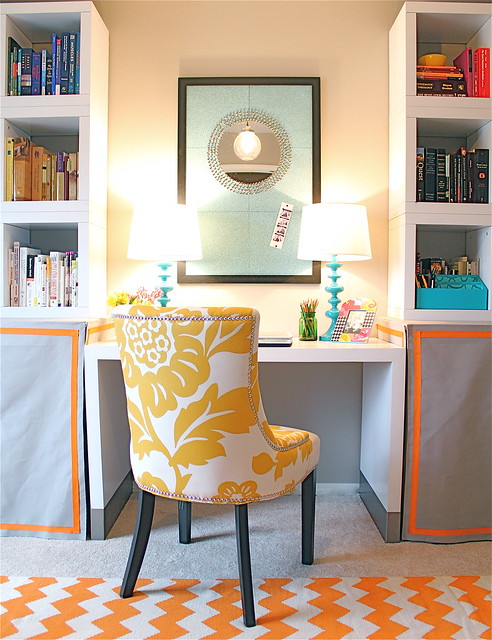
On the top part of the storage towers I used shelves to wrangle the enormous amount to books that the homeowners had (one of them went to med school- hence the collection of books). Lucky for me, the books were all sorts of fun colors, so I got to organize them according to their hue! Oh, the things designers get excited about. 🙂 haha
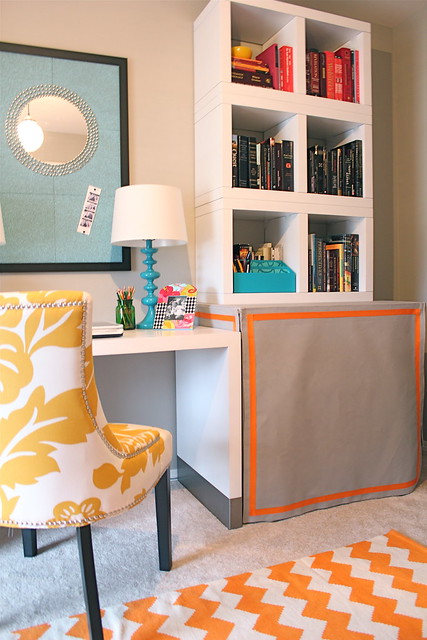
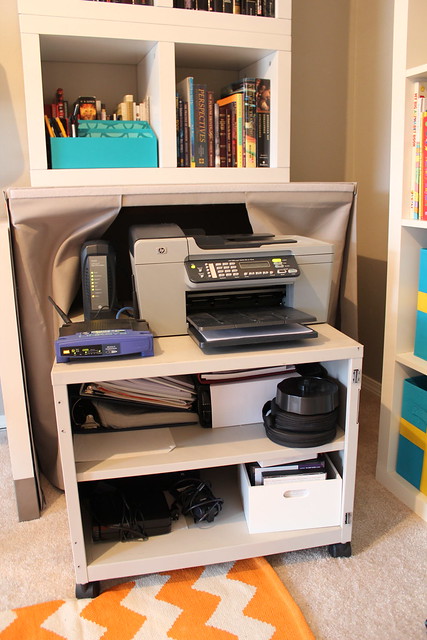
Anyway, the homeowners also made a special request that their printer be hidden. The skirted tables took care of that issue and also hide a ton of other not so pretty office stuff. I placed the printer on a rolling cart to make it easy to slide from underneath the table when it is needed. The front of the table skirt simply pulls off and re-attaches thanks to velcro. You can read more about the skirted tables and how to build them here.
Before, the desk itself was functional but its look was a little “college dorm room.”
BEFORE
So we replaced it with a simple and chic parson’s table.
AFTER

A actually found the “desk” on craigslist, but when I bought it, it was much too short. The homeowners are tall people and their legs would have never fit underneath it. But I liked the form and the price too much to search for something else. So, Tim had some metal caps fabricated to extend the table to a typical desk height.
I actually really like the finished look it provides. What about you? Did you even notice the metal before I mentioned our little modification?
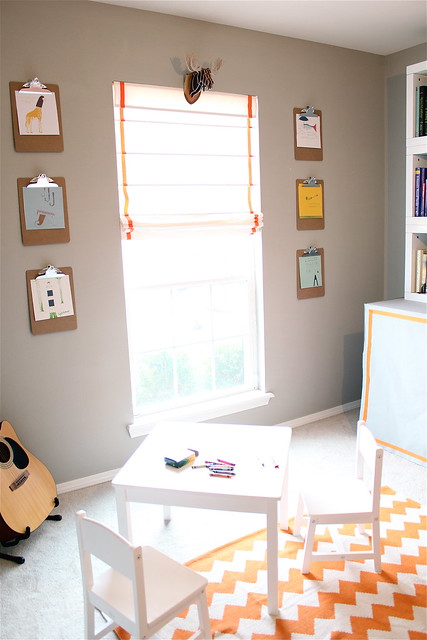
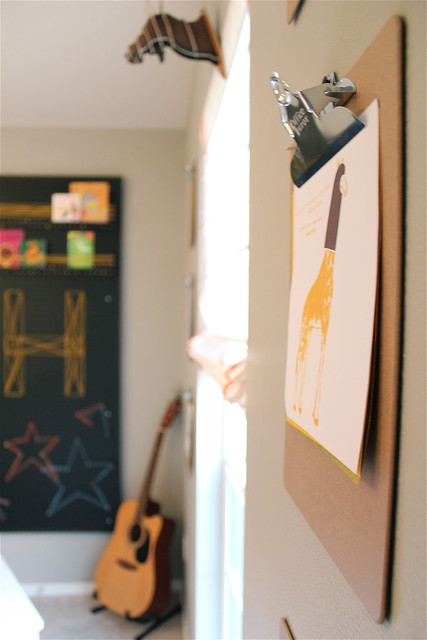
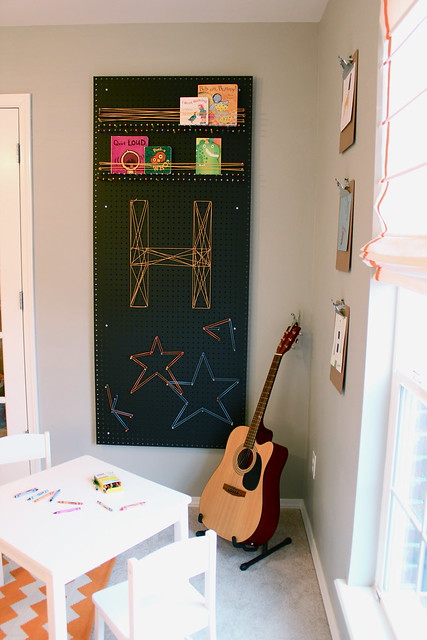
Of course, no room is complete without art of some sort. Well, I added a few different places for creativity to be celebrated. First we have the interchangeable art display (aka clipboards) that can hold everything from family photos to custom finger paintings to favorite illustrations from a children’s book!
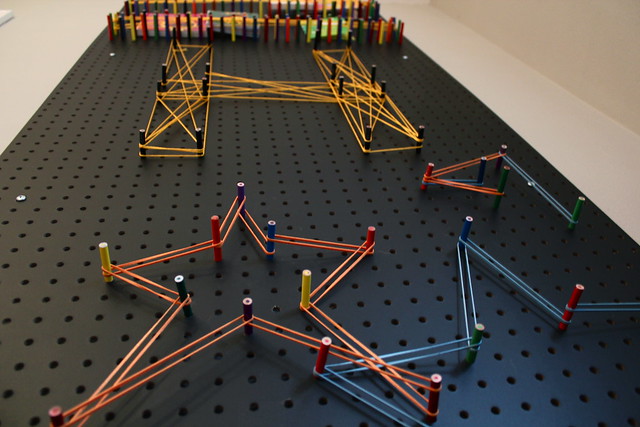
Then there was the pegboard art area.

I wanted this to be an interactive piece that both mom and the kids could get involved with. At the highest point, there are functional shelves (made from sticking colored pencils in the peg holes).
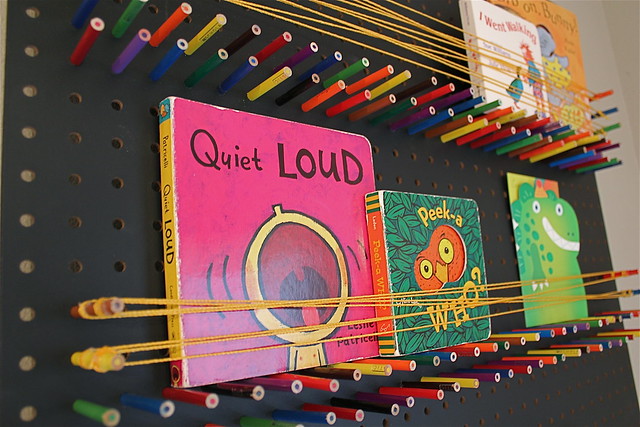
I wanted the rest of the space to serve as an area to display artistic expression. I left the board boasting a huge “H” (for the homeowners’ last name) and some stars! I used both string and rubber bands to create these shapes. My hope is that as they are inspired, the family will create new shapes and creative displays. You can read more about this interactive art piece here.
The last little DIY project I did in this room was the mirror frame I created out of thumb tacks.

We were out of money, but the space didn’t have a single mirror in it. I kind of love mirrors, so I decided I would find a way to easily and cheaply bring one in. My solution was to use part of the bulletin board above the desk to hold a simple circular craft mirror I got for a couple of bucks. The problem was the simple mirror looked a little too simple. It needed a frame of some sort. Soon after, I came up with the idea of using thumb tacks. I thought it was kind of perfect considering the mirror was on a bulletin board and in an office. I put things in place and ended up with this.
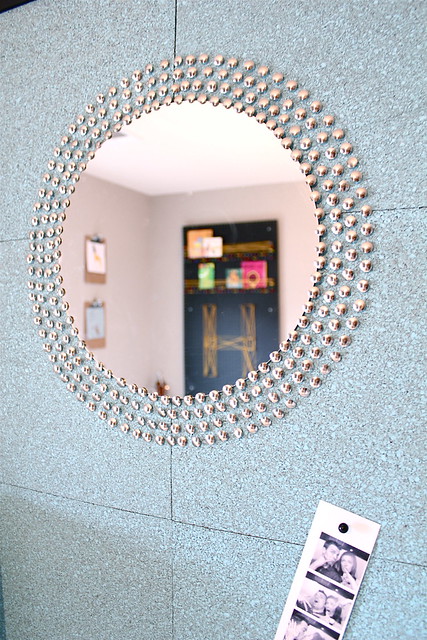
You can read more about the DIY thumb tack mirror right here.
So, that’s it- the entire room revealed! What do you think? Right up your alley or not your cup of tea?
Oh, I almost forgot. For those wondering, I got that chair from Marshall’s. It’s one of those hit or miss stores and I happened to nail the bulls eye when I walked in and saw that flowery chair one day! I was pretty pumped and I only had to shell out $130 for it!
PS- Tim and I will be on Tulsa’s Channel 2 today talking about DIY art if you want to tune in. We will be on around 11:40.
what a transformation! I love the pops of color, the functionality and style. The blue bins without the duct tape would have been ok, but it’s those details that make it pop. I love the combo of the flowered chair, the rug, and those awesome lamps. But my favorite is the pegboard and colored pencils. I think I could spend many happy hours making string designs 🙂
I have a very tired looking multi-functional room that I am trying to motivate myself to do something about and this office/playroom is a great inspiration. Ultimately, I wish it could get the Kara-treatment!
Love, love, love it! Seriously, it looks like it came straight out of a magazine. So beautiful and so functional, what could be better? Great work, Kara!
Thanks Lisa! You’re a sweetheart! I would love to give you the “Kara-treatment” anytime, but if you need to take the project on yourself, I am sure you will do a fantastic job! 🙂 PS- sent you a facebook message!
Wow, thanks for the amazing compliments Dana! I’m very intrigued by your woodland room! Can’t wait to see the final product! Have a great day friend!
I love what you did here! It’s the kind of before and after that makes me look around wondering what I can do to make my house look even better or work more smoothly! LOVE LOVE LOVE it! You are one talented lady:)
Fantastic room! The pegboard is especially genius. I am loving that rug – where is that from??
Love the room! Can you tell me how you made the bulletin board?
beautiful!
Wow! This room is great! I love all of your creative ideas. As always, another great post! Cindy
Thank you, thank you Jill! Have a great day!
Hey Justine! Congrats- I saw on your blog that you’re expecting! 🙂 The rug is from Urban Outfitters. It comes in a couple of colors and is pretty reasonably priced! 🙂
Hello! I just bought a black picture frame, took out the glass and then glued the cork squares to the frame insert. Super easy! Hope that helps! 🙂
Thanks Katie! 🙂
I appreciate your compliments Cindy! I do love a room with some creative/unique ideas. Glad you liked it.
Thanks! And thanks for the info – I will check it out!
I love what you did to this room!!! especailly the yellow tape on the blue boxes. reminds me of the swedish flag and my grandmother was swedish. great job!!!
I don’t have a blog but if you want to follow me on pinterest, here’s the link:
http://pinterest.com/erincl/
My most favourite home office ever!
New follower 🙂
Hi! Just found this post as I was googling ways to hide my cluster of cords and cables and router and modem that live in my kitchen.
Your skirted tables are great! For that matter, this whole room is just fantastic. I love the interactive art pegboard and the thumb tack mirror. So creative! Pinning it, for sure.
I’m you’re newest follow.
Thank you for sharing!
So beautiful! Are the storage towers flanking the desk from IKEA too? I love how you reclaimed space with them.