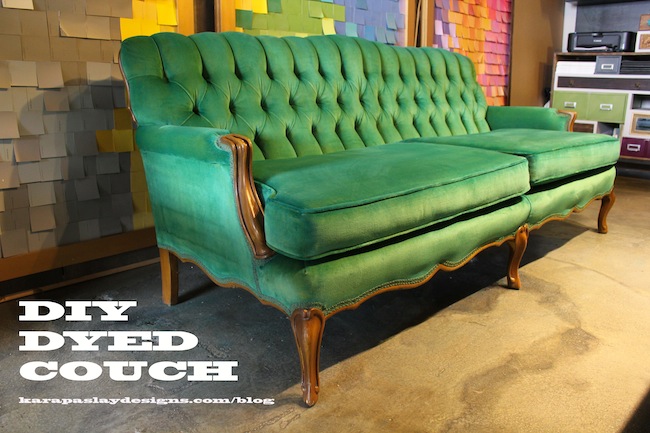
Hey Friends! About a year ago, Tim and I inherited a couch from Tim’s grandma. It was a vision of tufted goodness.
The couch had been in G-ma’s house for decades and was in great shape. I was thrilled to have it be a part of our home now. The candy apple green color was pretty, but not the shade of green that I most prefer. A deep, rich jewel tone is more my jam. Plus I felt like an emerald hue would be more attractive with the wood trim that on the couch.
Reupholstering the couch was an option, but with the fabric being in such good shape and knowing the cost of reupholstering I couldn’t justify that decision. So, what should I do?
You may remember a while ago when I used fabric dye to give these old chairs new life. Well, some ideas are worth repeating and after having success with that previous project, I knew it was time to give the dye another go!
I picked an inconspicuous place on the couch to try out the dye and make sure that the fabric would accept the color before I ruined the whole piece. I was thrilled when the fabric accepted the dye. Here’s how the piece looked about half way through the process.
The whole thing took me about 4 hours to dye, heat, and scotch guard. Let’s look at the B & A!
BEFORE
AFTER

The process of actually staining the piece is super easy. Here’s the step by step:
Step 1- Dissolve the dye in hot water. 1 cap full of dye for every cup of water.
Step 2- Make sure the fabric is clean.
Step 3- Use a paint brush to apply the dye to the fabric. PS- when dying a piece of furniture, make sure that you are choosing a color that is close to the original fabric on the color wheel.
Step 4- Once you have applied the dye to a large portion of the fabric, use a rag to massage the color into the fabric.
Step 5- Allow the fabric to dry completely.
Step 6- Apply more coats if needed and let dry again.
Step 7- Use a hairdryer to heat set the dye (this keeps the dye from rubbing off on clothes).
Step 8- Apply multiple coats of Scotch Guard to your piece.
The one concern that is brought up over and over in regards to this tutorial is the fear of color transfer to clothes. Both the heat from the hairdryer and the scotch guard serve to keep transfer from occurring. As a matter of fact, I always do a white shirt test on any piece I dye before allowing people to sit on it. The process has worked for me a couple of times now. I love this easy and inexpensive way to bring new life to old pieces!
‘Til tomorrow!
Hi Kara!
I love how your sofa turned out! it really is beautiful. I would love to pin this technique, however none of the pictures specific to this post are showing up when I hit my PinIt button. Any suggestions?
Nikki Kelly
kara i love this! i have tufted couch in a white damask print that’s not quite my style but has similarly beautiful lines and curves like the sofa you have. do you think a printed fabric will make the dye take up unevenly? i’m concerned if i want to do a rich royal blue that the woven/printed part of the damask will show up a different tint then the background fabric. thanks for all your wonderful inspirational work!
No way! That’s awesome! So much cheaper than reupholstering and totally amazing.
This looks amazing! Great idea to dye furniture. I’m going to have to keep my eye out for pieces to try this on.
I love this!! And I agree with the above commenter…I’d like to pin it but I can’t find a way to pin a picture of the couch!
Hey Nikki and Sunnie! Thanks so much for letting me know about this issue! I guess any pics I upload from Flickr are not available to pin! That’s bad news- but I’ve uploaded one of the couch pics directly to the blog, so it should be “pinable” now! Please let me know if it is not! Also, I uploaded a pic to one of my boards, so you can Pin from there if you like-
http://www.pinterest.com/pin/156077943310258560/
PS- thanks so much for pinning! Have a lovely day!
I follow you on Pinterest, so I see it! Thanks!! 🙂
After reading this tutorial, I happened upon a pair of chairs at the thrift that are basically the same color/material as your couch. For $25 (for the pair!!), I snatched up the chairs because they were in good shape, didn’t smell bad, and weren’t worn. I would love to try this, but I want to know more about choosing a color. Did you know aquamarine would turn emerald green? They would be fab in a turquoise/teal color, but not fab in my house. Do I just need to stay in the blue/green family? Can I go dark blue that will end up with a green tone since they’re lime-ish? I just need some advice. I’m kind of scared to take the plunge. (I’d love an email…I might forget to check back here.) Thanks for taking risks and sharing them with the rest of us!
Your chair and couch tutorials look amazing! I’m curious about the color wheel… I have chairs that are a taupe/ecru shade. I’m unsure of what color to attempt. Ideally, I’d like a rust red, a southwestern kind of vibe. Any thoughts or suggestions?
Thank you!! 🙂
I love this!! I’ve seen so many chairs and couches re-done with paint and that process scares me. I have an over sized dark purple (plum) chair that is a blended textitle fiber ..and it came with 3 over sized pillows in a light greyish blue, tan and the dark purple. I was wondering if I could dye my chair black, then restuff the pillows and paint them ?? I’m not sure or maybe try to get a nice patterned fabric to put over them.. Anyway back to my question.. Could I make it black? I do love this plum color though. I also have a light brown couch I can’t afford to buy a new one and I want them to match but my sofa is a different texture and fabric. Its more on the softer side I’d say. Any tips, advice and/or suggestions you can give me? I’m in no rush with this project as I am just starting out and I’m getting small projects in order first.. I’m just curious on how I could eventually do this. I love your creativity, all of your pieces are an inspiration to me 🙂
How much dye did did it take to dye the couch and what type of fabric is it (cotton, polyester, etc)?