
Hey Friends! Other than mantles and front doors, it’s usually table tops that get the most decor attention during the Holidays. Creating vignettes with Christmas-y decor on your coffee table, entry table, buffet, and dining table is an easy way to really bring a festive spirit to your house.
When you are decorating table tops, remember that lots of layers and levels make for the most interesting and dynamic displays! Notice the how many layers and different levels (heights) are created with various pieces in my set up below.
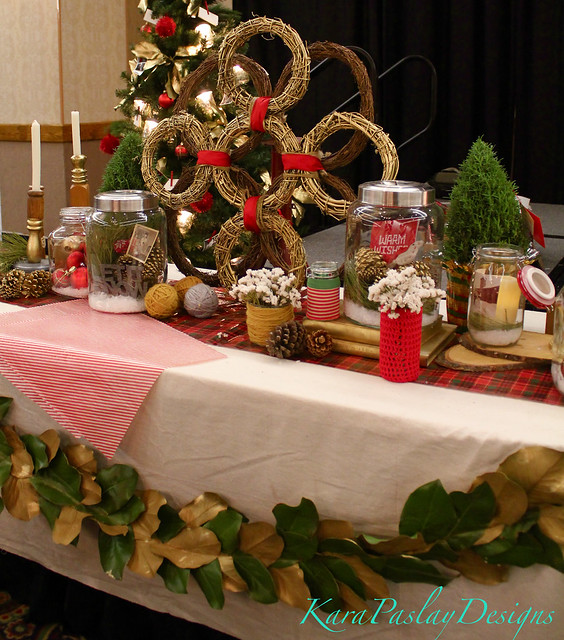
So, how do you create layers? Well generally, I like to start with a table runner to create that first layer.
There are a number of “do it yourself” table runner ideas out there, but if you go out and buy one, they are surprisingly not that cheap. So, if you tend to be a seasonal decorator or change your look for every hoilday, table runners can start to get expensive. Today’s idea is great because it not only allows you to customize your table top for the different seasons, but it’s also inexpensive and super easy!
So, the big tip (in case you didn’t figure it out from the title) is to use wrapping paper! Wrapping paper is such a great choice for adding a layer to your table top because there are endless options available at stores. There are always papers that coordinate with the current season or holiday and most papers are about $5/roll.
If you are planning an event and the runners will only be used once, you can cut the wrapping paper to your desired length & width and be done with it. However, if you are in your home and want to keep the runner on your table for a while, I figured out a way to make the paper piece more permanent!

I simply rolled (with a paint roller) this Plastic Urethane coating onto the paper and allowed it to dry. I did three coats and both sides to ensure good coverage. Once the all the coats were dry, I ended up with a plasticized piece that can be cleaned with a rag and reused over and over again! The paper I used was actually from the $1 bin at Target, so I imagine a higher quality paper would work even better!

I also made place mats with that striped paper. Another great way to add in layers.

In total, I spent $1 for this project because I already had the plastic urethane. Buying the urethane will set you back about $28 initially, but it will carry you through a number of projects. You can buy this product at Spectrum Paint (click here for locations). If you don’t have a spectrum paint nearby, I think a regular polyurethane would work, although it would probably not be quite as durable.
I hope this idea helps you to make your house a little more festive this season! Is it too early to say “Happy Holidays” and “Merry Christmas?!!!” 🙂
Wow! What a great idea! On my project list…
Pingback: DIY Christmas Decor Round-Up | Kara Paslay Design