
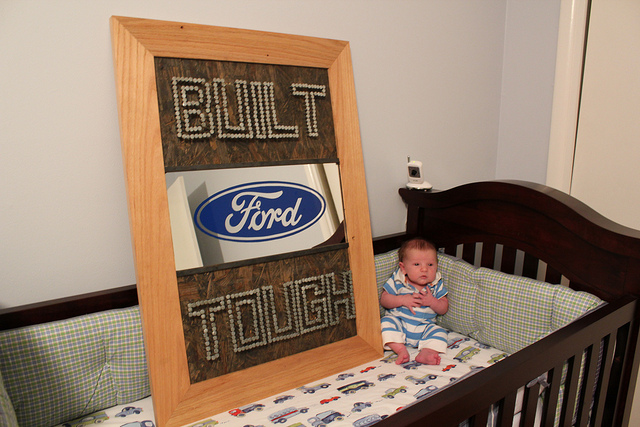
I am back here to give a quick DIY run down of the this piece I made for our friend Ford!

I started with a scrap 20″ x 30″ piece of 3/4″ OSB (Oriented Strand Board). It is pretty cheap and you can have Lowe’s or Home Depot cut it to whatever size you want if you don’t have a truck to haul it home.

The OSB has a waxy resin on the surface and I was afraid it would interfere with my stain so I sanded it off. I used 80 grit, it removes material quickly, but leaves a mostly smooth surface. I wasn’t too worried about it being perfect since it would be hanging on a wall and no one would touch it.

After experimenting with some waste pieces I decided I liked the look of an ebony stain that I wiped off immediately after application. I didn’t want it to be too dark. I really liked the color and texture of this.

I divided the piece into thirds and began to meticulously lay out the letters. I used a piece of foam so I didn’t have to hammer them and I could measure my samples to see how it would work.

After some calculations, I made my final decisions and began hammering. I started from the center and worked my way out.

When I got to this point I wanted to trash the piece and doing something else. Unlike everyone else in the state we are not Sooner Fans.

I managed to press on and I like how it turned out.

Next I started on my mirror. I had Lowe’s cut my mirror to 10″ x 20″ pieces. Luckily I had to buy a whole piece so I went ahead and had them cut extras. I ended up needing them. Like me you may have seen a few different tutorials on “antiquing” or removing the reflective part of the mirror. Here is what I ended up doing.

Step #1- I used 2″ white masking tape to cover the entire back of my mirror.

Step #2- I printed out the logo I wanted, reversed and in black and white. I thought it made the lines a little easier to follow. Making sure it was centered I taped this on the backside of the mirror and used an x-acto knife to cut out all the area’s that would be blue. Make sure to apply enough pressure to cut through the paper template and the tape underneath. It doesn’t take as much as you might think.

This is part I had to try a few different things and during my experimentation I forgot to take some pictures, so I’m going to do my best to explain it.
Step #3-I removed the tape from the black areas of the logo. I was left with tape spelling out FORD, the white ring and then everything outside the logo.
Step #4- Remove the protective layer of paint on the back of the mirror. I used this paint stripper with great success. Spray it on generously and let it sit. The paint will really start to bubble when it is ready to come off.

Step #5- Remove the tinning (the reflective mirror stuff).
I had read that oven cleaner will remove the silver but for me the only thing it removed was my tape and the protective paint. So after repeating the above steps I tried muriatic acid. You should definitely wear some protective items when handling this stuff. After my first try I didn’t think it was going to work either, but I let it sit longer the second time and started to see some progress. I let it do its work for 2 to 3 minutes then used some paper towels to wipe off what I could. It hadn’t removed all of it so I let my soaked rag lay on top of the mirror and every few minutes would wipe more of the tinning off until it was all gone. The tape will get a little soft and so you should be careful when you are wiping not to lift it off.

Step #6- Remove tape.
After making sure to wipe the area clean, I was left with clear glass everywhere the logo was black. I removed all my tape and the protective paint layer had held up nicely.
Step #7- Lastly, I used blue spray paint to cover the clear glass.

I didn’t like the exposed glass edge and I wanted to continue using masculine material so I purchased a 3′ stick of angle iron to frame the mirror and help hold it in place. I used black silicone to adhere the mirror and angle iron. After letting it set for 24 hours I added a frame and I was all finished.

I know none of you will probably replicate this project exactly, but hopefully it will inspire you incorporate bits or pieces into something totally your own!
-Tim
GO SOONERS!!!
(Sorry… couldn’t help myself. 😛 )
The OU part gave me a chuckle. Woo pig! 🙂
I will most definately do my best to follow this to a T….We are an all Ford family & I have 2 boys that would LOVE THIS MIRROR…..I often dream about being as crafty as you so do NOT laugh at my questions…..how do I print out the logo? Do I need to have someone print it for me?
Also the headboard you made out of corrugated tin that is on the HGTV website…where did you get that template to do that…it is another favorite that I could use for a couple of the 6 kids we have……
Thank you for your time…….and please keep the projects…with the instructions…coming…..lol